Google Workspace Tutorials

Google Apps Script Tutorial for Beginners

In this Google Apps Script tutorial for beginners you'll learn how to automate the formatting of a Google Sheets document.


Google Apps Script Tutorial for Beginners

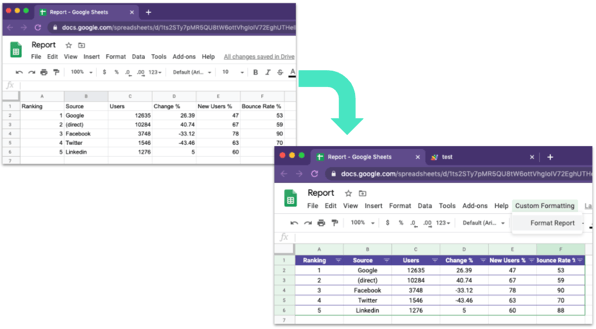
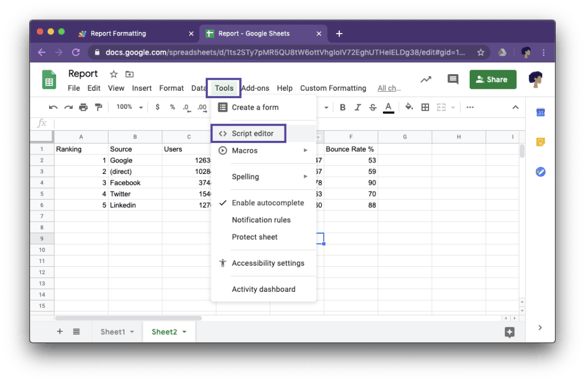
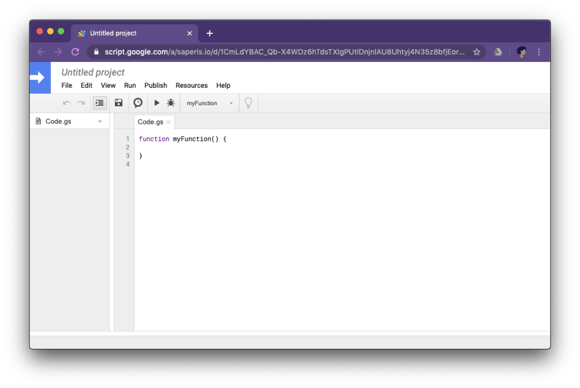
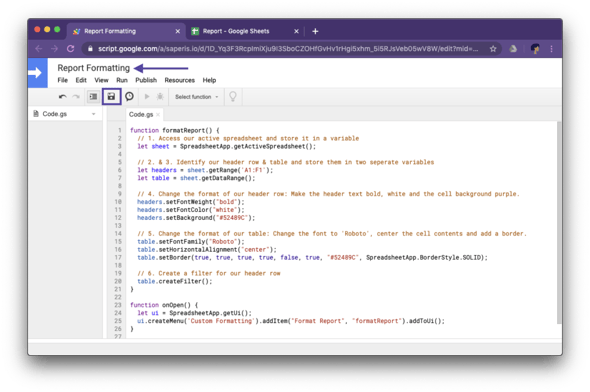
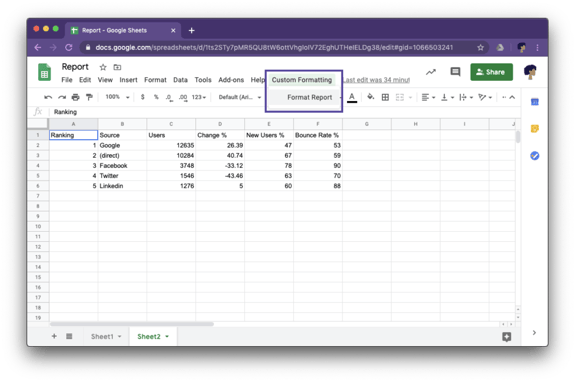
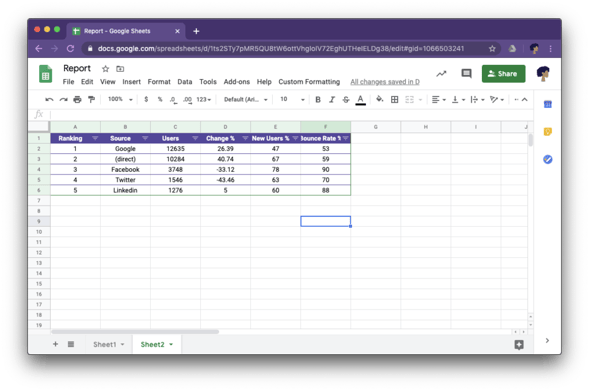
In this Google Apps Script tutorial for beginners you’ll learn how to automate the formatting of a Google Sheets document. With just a couple lines of code, you can automate almost anything within Google’s many apps. You’re wondering what Google Apps Script is? The short answer to that question is: Google Apps Script is a scripting language based on JavaScript, that’s built in to Google apps. Have a look a this blog post for an in depth explanation. 

This tutorial also comes in video form, where basic programming concepts like variables, objects, etc. are explained. Go ahead and check it out.


What we will be automating

Imagine you receive a report every week and you find yourself formatting it every single time. Wouldn’t it be cool to simply click on a button and have the report format itself?

That’s exactly what we’ll be doing in this tutorial! Well create a straight forward automation script to format a Google Sheets file.

Before and after screenshots
We want our Google Sheets file to be formatted automatically


Google Apps Script Tutorial - Where to get started

Look at most of the Google Apps and you’ll find your way to the script editor. In our tutorial we’re automating the formatting of a Google Sheets document. That’s why we access the script editor, where we will be writing our automation script, through Tools > Script editor in Google Sheets.

Access the script editor
In the menu choose Tools > Script editor

The script editor opens in a new browser tab and it contains a placeholder function by the name myFunction. You can delete this function and start writing your own.

Script editor
The script editor with the placeholder function

We’ll start off by naming our function, that is the code that will run for the formatting, formatReport.

Then we will do the following:

  • Access our active spreadsheet and store it in a variable named sheet (1). This is so that we can actually interact with our report.
  • We store the first row, which contains our headers, in a variable named headers (2). This is necessary since we want to format this first row with specific colors and options. 
  • Then we store all the rows and columns that contain data in the table variable (3).
function formatReport() {
  // 1. Access our active spreadsheet and store it in a variable
  let sheet = SpreadsheetApp.getActiveSpreadsheet();
  
  // 2. & 3. Identify our header row & table and store them in two seperate variables
  let headers = sheet.getRange('A1:F1');
  let table = sheet.getDataRange();
  } 

Now it’s time to define the formatting of our header. We’re changing the font weight to bold and the color to white. The last change is the background color which will be a beautiful saperis purple. 

// 4. Change the format of our header row: Make the header text bold, white and the cell background purple.
  headers.setFontWeight("bold");
  headers.setFontColor("white");
  headers.setBackground("#52489C"); 

Now we shift our attention to the entire table. We change the font to Roboto and align the cell content to the center.

The last line, table.setBorder… looks quite a bit complicated. To put it short we’re setting all four sides of every cell border to solid purple. 

 // 5. Change the format of our table: Change the font to 'Roboto', center the cell contents and add a border.
  table.setFontFamily("Roboto");
  table.setHorizontalAlignment("center");
  table.setBorder(true, true, true, true, false, true, "#52489C", SpreadsheetApp.BorderStyle.SOLID); 

The last step in this function is to create a filter. We do so by calling the createFilter method on our table object.

  // 6. Create a filter for our header row
  table.createFilter(); 


Create a menu to run the code

We probably don’t want to have to start up the script editor every time we want to run our code. That would be a bit tedious. 

Instead we want a menu to appear in Google Sheets so we can easily run our automation script. 

We create a separate function named onOpen. This is the default name provided by Google for whenever you want to add a custom menu to a Google app.

function onOpen() {
  let ui = SpreadsheetApp.getUi();
  ui.createMenu('Custom Formatting').addItem("Format Report", "formatReport").addToUi();
} 


Putting it all together

Now we have everything we need for our automation script. Here how the script should look once you’re done putting it together.

function formatReport() {
  // 1. Access our active spreadsheet and store it in a variable
  let sheet = SpreadsheetApp.getActiveSpreadsheet();
  
  // 2. & 3. Identify our header row & table and store them in two seperate variables
  let headers = sheet.getRange('A1:F1');
  let table = sheet.getDataRange();
  
  // 4. Change the format of our header row: Make the header text bold, white and the cell background purple.
  headers.setFontWeight("bold");
  headers.setFontColor("white");
  headers.setBackground("#52489C");
  
  // 5. Change the format of our table: Change the font to 'Roboto', center the cell contents and add a border.
  table.setFontFamily("Roboto");
  table.setHorizontalAlignment("center");
  table.setBorder(true, true, true, true, false, true, "#52489C", SpreadsheetApp.BorderStyle.SOLID);
  
  // 6. Create a filter for our header row
  table.createFilter();
}

function onOpen() {
  let ui = SpreadsheetApp.getUi();
  ui.createMenu('Custom Formatting').addItem("Format Report", "formatReport").addToUi();
} 

Before you leave the script editor be sure to save your automation script by clicking on the Save icon and giving it a name. In our tutorial we named our script Report Formatting.

The final code
This is all the code needed to automate the formatting


Running the automation script

To actually run our automation script so that it formats our report, we head back to our Google Sheets document.

Reload the document in your browser and after about 15 seconds our Custom Formatting appears in the menu list. That menu was created by the second function in our script we created.

Custom menu with item
Click the custom menu item to run the report

You will be asked to grant your script the rights to access your account. Confirm this. Then click again on Custom Formatting > Format Report to run it.

After about 5 seconds your report should look something like this.

Automatically formatted report
The automatically formatted report


Further Information

That wasn’t that difficult, was it? If you’re new to automation or coding lots of things in the code above might seam strange to you. What are variables? What is a function? What are methods? And many more questions…

I encourage you to check out our Google Apps Script playlist on YouTube to learn more about this useful coding language. 


Similar posts

Google Workspace Blog

Don't want to miss any of our blog posts about Google Workspace? Then go ahead and sign up!